Tóm tắt sách: Quẳng gánh lo đi và vui sống – Dale Carnegie
Phần 1: Các nguyên tắc cơ bản để loại bỏ sự lo lắng
Nguyên tắc 1: Hãy sống với ngày hôm nay, đừng bận tâm đến quá khứ và lo lắng về tương lai
Nguyên tắc 2: Đối mặt với sự lo lắng bằng cách
Tự hỏi bản thân: “Điều tệ nhất có thể xảy ra là gì?”
Chuẩn bị tinh thần để chấp nhận điều tồi tệ nhất.
Nỗ lực cải thiện tình trạng xấu nhất.
Nguyên tắc 3: Nhắc nhở bản thân về cái giá phải trả bằng sức khoẻ của chính mình khi chúng ta quá lo lắng.
Phần 2: Phương pháp phân tích và giải quyết sự lo lắng
Nguyên tắc 1: Tìm hiểu vấn đề gây lo lắng, thu thập tất cả các dữ liệu có liên quan.
Nguyên tắc 2: Cân nhắc tất cả các thông tin, rồi đưa ra quyết định.
Nguyên tắc 3: Một khi đã đưa ra quyết định, hãy thực hiện ngay và kiên định làm theo quyết định đó.
Nguyên tắc 4: Nêu ra và trả lời bốn câu hỏi sau:
Vấn đề là gì?
Đâu là nguyên nhân gây ra vấn đề
Tất cả những giải pháp có thể đưa ra để giải quyết vấn đề là gì?
Giải pháp tốt nhất là gì?
Phần 3: Phá bỏ thói quen lo lắng trước khi sự lo lắng tàn phá chúng ta
Nguyên tắc 1: Loại bỏ tất cả lo lắng ra khỏi đầu bạn bằng cách giữ cho mình luôn bận rộn
Nguyên tắc 2: Đừng quan tâm quá nhiều đến những chuyện vặt vãnh. “Cuộc đời quá ngắn ngủi để có thời gian xét nét những điều vụn vặt”
Nguyên tắc 3: Sử dụng luật bình quân để loại bỏ những nỗi lo lắng. Tự hỏi bản thân: “Xác suất xảy ra việc này là bao nhiêu?”
Nguyên tắc 4: Hợp tác với những điều không thể tránh khỏi. Nếu lâm vào tình thế nằm ngoài khả năng thay đổi hay cải thiện của bạn, hãy tự nhắc bản thân rằng “Chuyện cũng đã vậy rồi, không thể khác được”
Nguyên tắc 5: Đặt một lệnh “dừng” đối với nỗi lo lắng của chúng ta. Đừng dành cho nó sự quan tâm quá mức.
Nguyên tắc 6: Hãy sống với hiện tại và để cho quá khứ tự chôn vùi những sai lầm của nó.
Phần 4: 7 cách luyện tinh thần để sống thanh thản và hạnh phúc
Nguyên tắc 1:Suy nghĩ và hành động một cách vui tươi: Suy nghĩ của chúng ta tạo nên cuộc đời của chúng ta, suy nghĩ tích cực thì chúng ta sẽ hạnh phúc.
Nguyên tắc 2: Đừng bao giờ cố trả đũa kẻ thù của mình: Sự oán ghét của ta chẳng làm tổn thương kẻ thù mà chỉ khién cho cuộc sống của ta trở thành những chuỗi ngày khốn khổ, chúng ta sẽ làm tổn thương bản thân còn nhiều hơn là tổn thương họ.
Nguyên tắc 3: Luôn chuẩn bị tinh thần để đối diện với sự vô ơn: Hãy chấp nhận đó là một điều bình thường. Cách duy nhất để có thể tìm thấy hạnh phúc là đừng mong đợi được biết ơn mà hãy cứ cho đi và vui hưởng niềm hạnh phúc từ việc làm ấy. Muốn con cái có thái độ biết ơn thì ta phải dạy bảo chúng bằng chính hành động và thái độ của mình.
Nguyên tắc 4: Hãy nghĩ đến những điều may mắn mà bạn có được – chứ không phải những rắc rối.
Nguyên tắc 5:Hãy là chính mình! Đừng bắt chước người khác. Hãy khám phá bản thân và tự tin là chính mình
Nguyên tắc 6: Chấp nhận và biến khó khăn thành cơ hội: Nếu đời cho ta một quả chanh, hay pha thành ly nước chanh. Đức tính kỳ diệu của con người là “khả năng biến mất thành được”. Điều thực sự quan trọng là phải biết thu lợi từ chính những cái đã mất.
Nguyên tắc 7:Hãy quên đi bản thân và mang niềm vui, hạnh phúc đến cho người khác.
Phần 5: Gạt bỏ nỗi lo bị chỉ trích
Nguyên tắc 1:Một lời chỉ trích bất công thường là những lời ca ngợi bị biến hình vì ghen tị vì không ai thèm soi mói vì một kẻ tầm thường.
Nguyên tắc 2:Hãy làm tốt những gì có thể rồi bật chiếc dù của bạn lên để cơn mưa nhận xét không làm ướt gáy bạn.
Nguyên tắc 3: Ghi nhận và phân tích những điểm yếu của bản thân.
Phần 6: 6 cách tránh mệt mỏi và lo lắng, đồng thời nâng cao tinh thần và sức lực
Nguyên tắc 1: Nghỉ ngơi trước khi bị mệt
Nguyên tắc 2: Học cách thư giãn khi đang làm việc
Nguyên tắc 3: Học cách thư giãn khi ở nhà
Nguyên tắc 4:Áp dụng bốn thói quen trong lúc làm việc:
Dọn sạch tất cả giấy tờ trên bàn, trừ những thứ liên quan đến vấn đề đang giải quyết
Xử lý mọi việc theo thứ tự quan trọng
Khi gặp vấn đề nảy sinh, hãy giải quyết luôn nếu thấy có đầy đủ các yếu tố cần thiết để đưa ra quyết định
Học cách tổ chức, uỷ quyền và giám sát công việc
Nguyên tắc 5: Nhiệt tình với công việc
Nguyên tắc 6: Không nên lo lắng về sự mất ngủ. Chính sự lo lắng về chứng mất ngủ mới huỷ hoại sức khoẻ của bạn chứ không phải chứng mất ngủ
We’ve been doing some experimentation with containers and Docker/Docker Swarm for some of our on-premise applications at work. I’ve only just touched Kubernetes, the apparent winner of the container orchestration and management battle in the infotech arena. Now having some real experience under my belt with Docker/Docker Swarm (though I’ve got a ton still to learn), I wanted to get some real experience with Kubernetes.
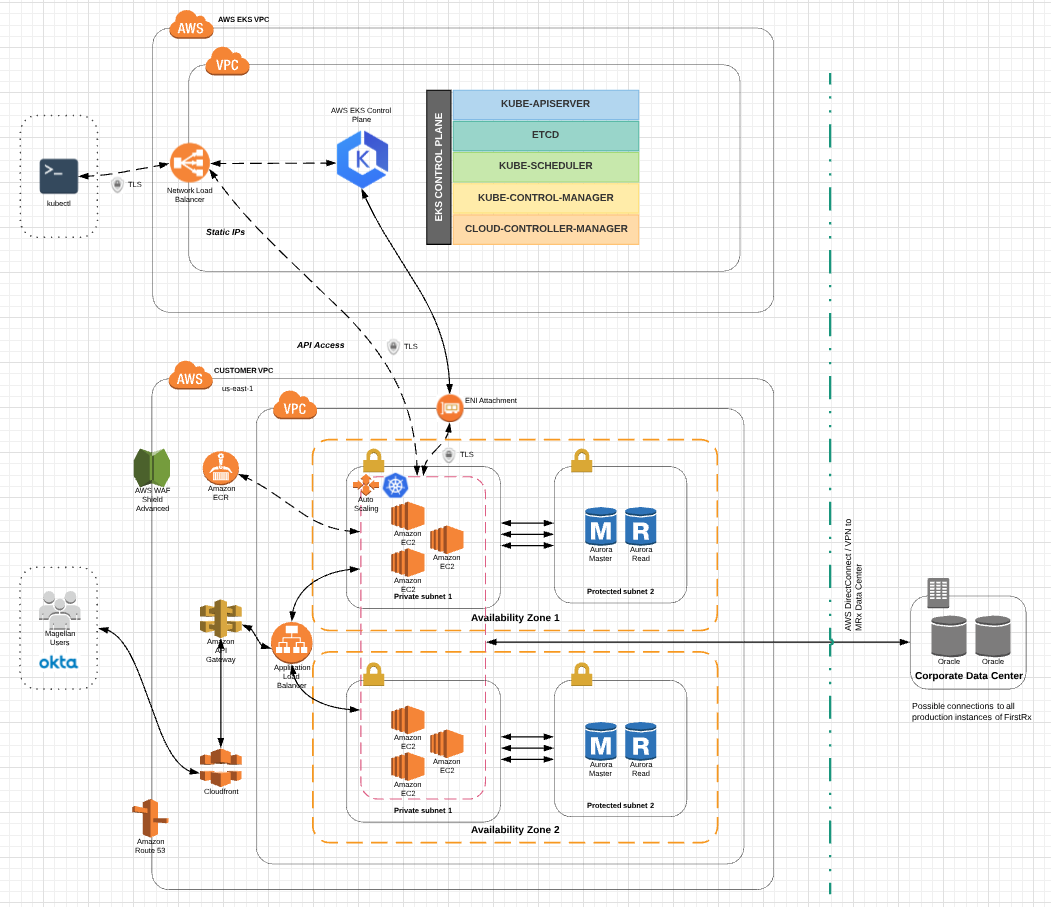
Over the past week and this weekend, I took the opportunity to dive deeper in to Kubernetes (k8s), specifically with Amazon EKS. This is the project I completed with the steps involved. The outputs of the steps are not exactly 1:1 to the architecture diagram I was basing this experiment on, but it does give a rough idea. If you’re interested in building your own Amazon EKS Cluster and Worker Nodes, you can do so following the steps here: https://github.com/m3kan1cal/aws-eks-demo
Create EKS Cluster Service Role in IAM
To create your Amazon EKS service role in the IAM console:
If you want to use values other than the defaults, check the CloudFormation template at the referenced URL for the parameters to work with. Note the following outputs generated from this command. These values will be used later in this demo.
aws cloudformation describe-stacks --profile=stoic \
    --stack-name "Stoic-EksCluster-Vpc-Stack" \
    --query "Stacks[].Outputs"[
    [
        {
            "OutputKey": "SecurityGroups",
            "OutputValue": "sg-069a1b7585d2ec879",
            "Description": "Security group for the cluster control plane communication with worker nodes"
        },
        {
            "OutputKey": "VpcId",
            "OutputValue": "vpc-0ee2845a85eef4d1b",
            "Description": "The VPC Id"
        },
        {
            "OutputKey": "SubnetIds",
            "OutputValue": "subnet-048f7eb94d7433cfa,subnet-0deacae0efb648275,subnet-015c0bdab265cf8fa",
            "Description": "All subnets in the VPC"
        }
    ]
]
Install kubectl for Amazon EKS
Kubernetes uses a command-line utility called kubectl for communicating with the cluster API server. Beginning with Kubernetes version 1.10, you can configure the kubectl client to work with Amazon EKS by installing the AWS IAM Authenticator for Kubernetes and modifying your kubectl configuration file to use it for authentication.
Amazon EKS clusters require the https://github.com/kubernetes-sigs/aws-iam-authenticator to allow IAM authentication for your Kubernetes cluster. Beginning with Kubernetes version 1.10, you can configure the kubectl client to work with Amazon EKS by installing the AWS IAM Authenticator for Kubernetes and modifying your kubectl configuration file to use it for authentication.
In the Kubernetes Engine, a cluster consists of at least one cluster master and multiple worker machines called nodes. A cluster is the foundation of KE: the Kubernetes objects that represent your containerized applications all run on top of a cluster. With this basic understanding on the table, and the above commands completed, now you can create your Amazon EKS cluster. There are some subtleties related to the IAM User or Role that creates the cluster and the ability to make API calls to the EKS API server. Make sure you know what IAM User or Role you are using when creating the cluster.
Note that the arn used in the following command for creating your EKS cluster is the one tied to the service role created at the beginning of this demo. The subnetIds and securityGroupIds are the values you noted above when the describe-stacks command was run against your EKS Cluster VPC CloudFormation stack.
If the above command is successful (if it fails, it’s most likely related to the IAM User or Role used to execute command), then you should see output similar to the above. Cluster provisioning usually takes less than 10 minutes. You can query the status of your cluster with the following command.
When your cluster status is ACTIVE, you can proceed. You can also omit the --query option to get a complete metadata listing of your EKS Cluster. A few other helpful commands to verify different aspects of your cluster are listed below:
First, make sure you have kubectl installed. Use these instructions for your OS platform:
Now it’s time to create your kubeconfig file for the EKS cluster you just built. Use the AWS CLI update-kubeconfig command to create or update your kubeconfig for your cluster. By default, the resulting configuration file is created at the default kubeconfig path (.kube/config) in your home directory or merged with an existing kubeconfig at that location. You can specify another path with the --kubeconfig option, which we’ll do in the following command.
Once you see a message about adding/updating a new context, then it’s almost time to test your configuration that was just created.
We’re going to make one modification before we move on. Most users are going to be using multiple AWS profiles when interacting with the CLI. To accommodate this scenario, open up the ~/.kube/config-Stoic-EksCluster file and add the following to the users section of the config file, right below the command: aws-iam-authenticator line. This will tell kubectl to use the AWS profile and credentials that the EKS Cluster was created with.
env:
- name: AWS_PROFILE
  value: stoic
We’re also going to make one more modification to our KUBECONFIG environment variable to accommodate multiple Kubernetes cluster configurations on your local machine. If you’ve worked with Kubernetes before, you may have an environment variable named KUBECONFIG. If so, save the current value of your KUBECONFIG environment variable, so you can restore it later. For example, on Linux:
export KUBECONFIG_SAVED=$KUBECONFIG
The KUBECONFIG environment variable is a list of paths to configuration files. The list is colon-delimited for Linux and Mac, and semicolon-delimited for Windows. If you do have a KUBECONFIG environment variable, familiarize yourself with the configuration files in the list.
If you have a $HOME/.kube/config-Stoic-EksCluster file like we created in this demo, and it’s not already listed in your KUBECONFIG environment variable, append it to your KUBECONFIG environment variable now. For example, on Linux:
If you find that you want to restore your configuration to the previous value, return your KUBECONFIG environment variable to its original value like this:
export KUBECONFIG=$KUBECONFIG_SAVED
Also, as you get going with kubectl you’re going to want to remember a few commands. Bookmark this URL for quick reference: https://kubernetes.io/docs/reference/kubectl/cheatsheet/. One small tip to prevent insanity is to run your commands with verbose logging enabled.
kubectl get svc --v=10NAME         TYPE        CLUSTER-IP   EXTERNAL-IP   PORT(S)   AGE
kubernetes   ClusterIP   10.100.0.1           443/TCP   5m
If everything checks out, you should end up with output like the above. To verify a bit more information on your EKS Cluster, use the following command:
Now that your VPC and Kubernetes control plane are created, you can launch and configure your worker nodes. Likely enough time has passed, but you need to wait for your cluster status to show as ACTIVE. If you launch your worker nodes before the cluster is active, the worker nodes will fail to register with the cluster and you will have to relaunch them.
Launch the CloudFormation Stack for the worker nodes with this command:
Note the following outputs generated from this command. These values will be used later in this demo.
aws cloudformation describe-stacks --profile=stoic \
    --stack-name "Stoic-EksCluster-WorkerNodes-Stack" \
    --query "Stacks[].Outputs"[
    [
        {
            "OutputKey": "NodeInstanceRole",
            "OutputValue": "arn:aws:iam::750444023825:role/Stoic-EksCluster-WorkerNodes-Stac-NodeInstanceRole-1LNSVW11HNA8Z",
            "Description": "The node instance role"
        },
        {
            "OutputKey": "NodeSecurityGroup",
            "OutputValue": "sg-00d7e7bd57570de90",
            "Description": "The security group for the node group"
        }
    ]
]
Enable Worker Nodes to Join EKS Cluster
We’ve got to do one thing to allow our new worker nodes to join the EKS Cluster we created. That means we need to download, edit, and apply the AWS authenticator configuration map.
2. Open the file with your favorite text editor. Replace the `rolearn` value with the `NodeInstanceRole` value that you recorded in the previous CloudFormation Stack creation procedure, and save the file.
When you see output like the above scrolling output, then you’re ready to move on to getting controllers and services deployed to your cluster.
Launching a Guest Book Application
Now that all our resources are created, we’re ready to actually do something with them. Even though we have a fully functioning and managed Amazon EKS Cluster and Worker Nodes, they’re not doing anything other than incurring costs in your AWS account. For this demo, we’re going to be using the sample Kubernetes guest book application right from the https://github.com/kubernetes/examples/blob/master/guestbook-go/README.md documentation.
After all is said and done, we’re going to have a Redis Master/Slave Replication Controller, a Redis Master/Slave Service, a Guestbook Replication Controller, and a Guestbook Service running on our EKS Cluster. Use the commands below to accomplish this.
1. Create the Redis master replication controller.
7. Now it’s time to query the services in your cluster and wait until the `External IP` column for the guestbook service is populated. It may take several minutes before the IP address is available.
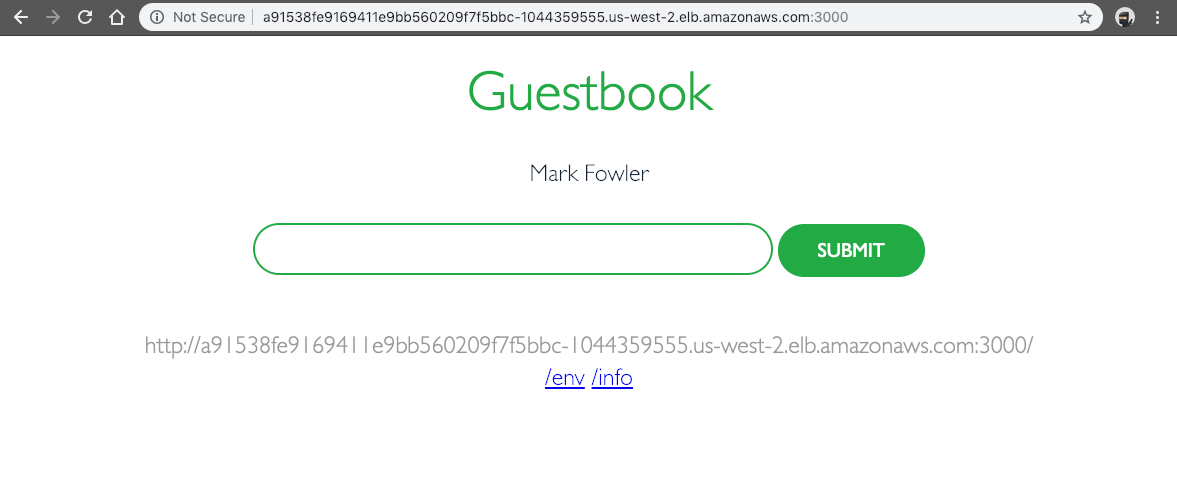
After your external IP address is available, point a web browser to that address at port `3000` to view your guest book. Note that it may take several minutes for DNS to propagate and for your guest book to show up. If everything is working properly, you should see something similar in your browser to the screenshot below.
Cleaning Up the Guestbook Demo Application
When you are finished experimenting with your guest book application, you should clean up the resources that you created for it. The following command deletes all of the services and replication controllers for the guest book application:
When you are done with your Amazon EKS cluster, you should delete it and its resources so that you do not incur additional charges. Be warned that the EKS Cluster and Worker Nodes will rack up some costs pretty quickly if left unchecked.
When you are done with your Amazon EKS cluster, you should delete it and its resources so that you do not incur additional charges. Be warned that the EKS Cluster and Worker Nodes will rack up some costs pretty quickly if left unchecked. Use these commands to clean up your stacks and EKS cluster.
Kubernetes has a certain “hardened through battle” feel to it. It just feels rock solid as you’re playing with it, watching it scale worker nodes in and out, working with the REST API to control your cluster.
k8s also is very complex. Much more so than Docker/Docker Swarm to me. Without significant experience, I don’t think I’d want to set up a k8s cluster on-prem. Docker Swarm seems much more simple to build and maintain for an on-premise team.
Amazon EKS has made the process of spinning up an EKS Cluster and Work Nodes as easy I can picture it being. It’s not surprising to me that its carving out a big chunk of the k8s space.
Having played with k8s at a high-level this week, I see some very solid use cases within work. My brain is focused on a “best of breed” Rx claims adjudication system for the near future, and I see some very strong opportunities for Amazon EKS for more automation, more lightweight virtualization, more resiliency, microservices and decoupling systems, and more horizontal scaling.
Also, if we do decide to bring Amazon EKS in-house or another flavor of k8s, we’ll need to be careful. We can do it but we’ll need a very solid plan or we’ll end up more brittle than we are now.