I recently started to use Jenkins 2 Pipeline scripts to setup Continuous Delivery Process. I wanted to get the email of the Git user who has done the commit for that particular build. Initially idea was to use following global variables set by the Jenkins Git Plugin.
GIT_AUTHOR_NAME and GIT_COMMITTER_NAME
GIT_AUTHOR_EMAIL and GIT_COMMITTER_EMAIL
Somehow, things didn’t work as per the plugin documentation. So, I decided to use Git client with shell or batch scripts. Following is how it is done in both Linux and Windows environments.
Fix bug "the public key is not available: NO_PUBKEY 611B903CAB97EA77"
$ sudo apt update
...
Err:7 https://download.01.org/gfx/ubuntu/17.04/main zesty InRelease
The following signatures couldn't be verified because the public key is not available: NO_PUBKEY 611B903CAB97EA77
...
Reading package lists... Done
W: GPG error: https://download.01.org/gfx/ubuntu/17.04/main zesty InRelease: The following signatures couldn't be verified because the public key is not available: NO_PUBKEY 611B903CAB97EA77
E: The repository 'https://download.01.org/gfx/ubuntu/17.04/main zesty InRelease' is not signed.
N: Updating from such a repository can't be done securely, and is therefore disabled by default.
N: See apt-secure(8) manpage for repository creation and user configuration details.
This document contains instructions on using a non-Microsoft email client, such as Apple Mail or Thunderbird. Microsoft does not recommend these clients for use with Office 365, and there are often significant limitations in client functionality as a result.
Because of this, the DoIT Help Desk is only able to offer best effort support for these clients, and certain issues may require the use of a Microsoft client in order to be resolved. For more information on Office 365 client support, please see: Office 365 - Which clients/protocols will be supported?.
This document explains how to connect to the Office 365 service.
Important: Use of Linux/Evolution is not supported and therefore the Help Desk will not be able to provide any type of troubleshooting. Use these instructions as a general overview for connecting your Office 365 account UW-Madison's implementation.
To configure the Evolution client to access the Office 365 environment, follow the steps below. Note that these instructions use Evolution 3.6.2 and the evolution-ews plugin version 3.6.
If you have not already done so, install the evolution-ews package using your favorite package manager. This document assumes evolution-ews version 3.6. Mileage may vary on other versions.
Launch Evolution
Add a new account by going to Edit | Preferences and choose Add from the Mail Accounts menu.
Click Continue
Enter your name as you'd like it to appear and "netid@wisc.edu" or "first.lastname@wisc.edu" or "name@domain.wisc.edu" for Email Address, click Continue
The account information screen will find incorrect information. Click Go Back
On the resulting window, enter the following information for each field:
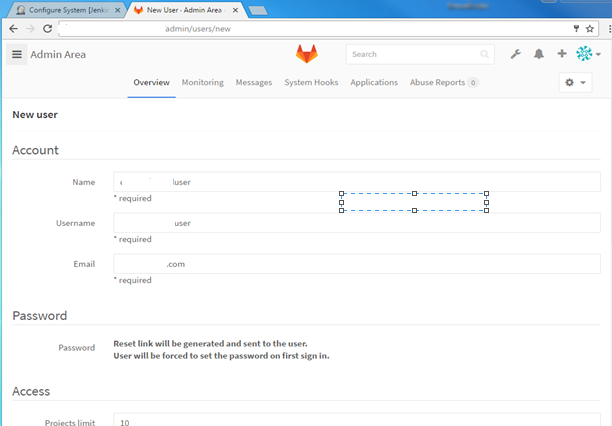
a) Go to “Admin area” page using the settings symbol at top right corner
b) Click on “New User” button which takes you to the below screen
2. Enter the desired account details in respective fields and hit save.
a) An email with a link to reset the password will be sent to the email address entered above
b) Log out of current page and Log in from User account
b) Password page as shown below will be displayed to enter a new password
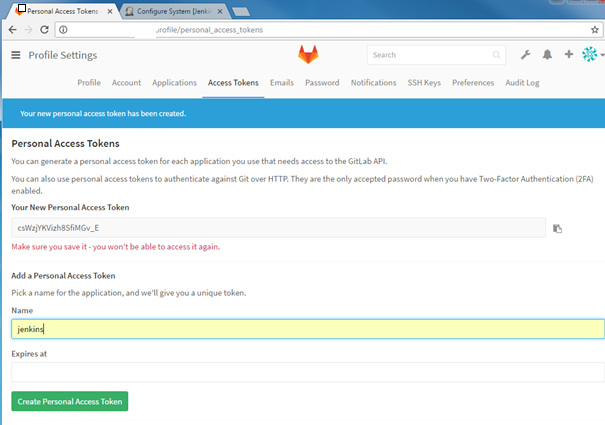
3. An “Access Token” needs to be setup in order to use it with Jenkins to get metadata from Gitlab
a) Go to Profile Setting, click on “Access Tokens” and create a new token:
b) Type the desired Token Name
c) Click “Create Personal Access Token”
4. A personal Access Token string is generated as shown above
a) Copy and securely save the above token to avoid regeneration. However, you can create a new one if you lost or mess it up!
5. Log out of User Gitlab account and log back in as an Administrator.
6. Give the “user” account developer permissions to your new project/group
7. To do that, go to “Admin area” page
8. Hit on the respective Group or Project to add the user as shown below
9. For instance, type “user” to grant them developer permissions and hit “Add users to group”
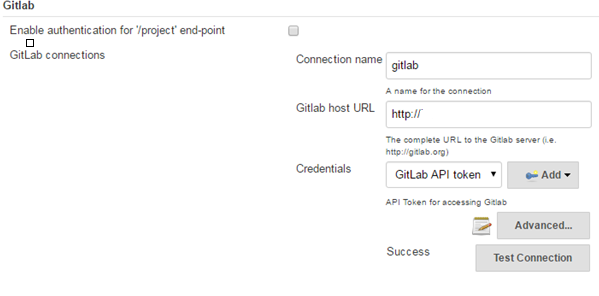
10. To configure Gitlab details in jenkins , so that jenkins can fetch up/checkout/get the code from the gitlab source control repositories we need to configure jenkins with the Gitlab server details in the jenkins configuration. Open up Jenkins page and navigate to “Manage > Configure System,” and scroll down to the “Gitlab” section. You’ll need to enter your Gitlab details into Jenkins.
11. Click on the Credentials drop down list to add “Gitlab Api Token” and enter the API token(that was asked to save securely in step 4) in jenkins as shown below.
12. Advance to the next step and make sure that “Kind” credential is selected in the dropdown. If it doesn’t appear, you need to add the “credentials” plugin.
13. In case, if that doesn’t work, install the “Plain Credentials” plugin and restart Jenkins. After that it should be selectable.
14. Go back to Jenkins page and navigate to “Manage -> Global Tool Configuration,” and scroll down to the “Git” section. Specify the path where you installed the Git (should be latest version — 2.11) and save it.
15. Enter the local Git location as shown above.
16. We can now see, Jenkins is configured into our Gitlab.
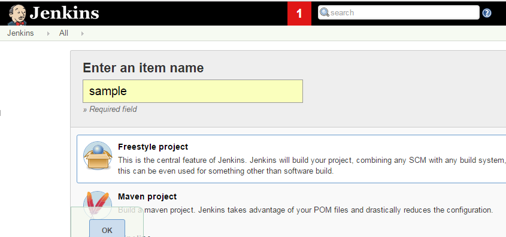
17. A job to continuously build our application can be setup using the main screen of Jenkins following the below steps
a) Click on create a new “freestyle” job:
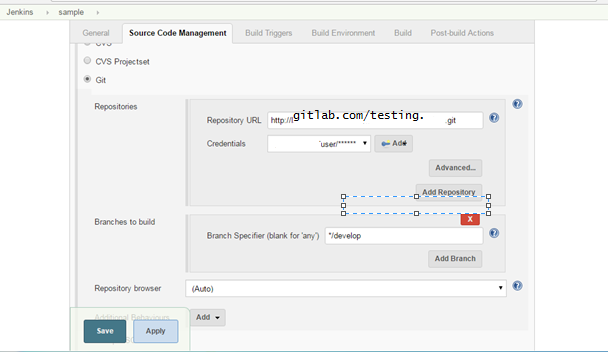
b) Scroll down to Source Code management, select Git, and enter your repo details:
C) Scroll down to “Build Trigger”, and select “Poll SCM” option by enabling the poll SCM and entering a cron expression**** in the Schedule text box we can get Jenkins to poll the Git repository for any changes at scheduled time.
18. Click on save button and trigger a build, make changes to your code commit and push it. Now it will automatically notify Jenkins to build your code.
Configure Artifactory repository details in Jenkins:
We use JFrog Artifactory as binary repository mangment tool. Nexus is also another binary repository management toll widely used.
1-we need to have common user to communicate between Jenkins and artifactory, login to the Jforg Artifactory console as an administrator.
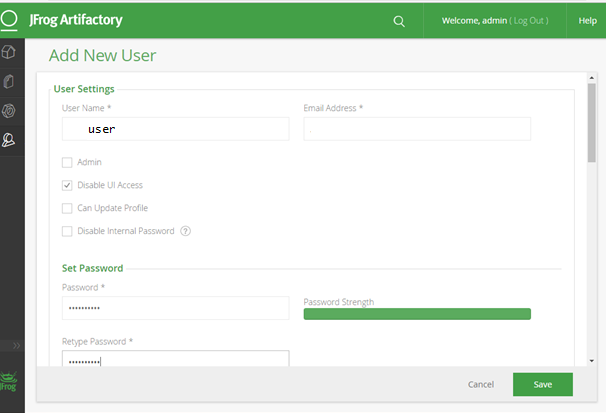
a) Go to Admin area navigate to Users Click on “New User” button which takes you to the below screen.
b) Enter the desired fields and make sure to tick Disable UI Access (We are using this user only for connectivity between Jenkins and Jforg Artifactory not to access the UI) Click save.
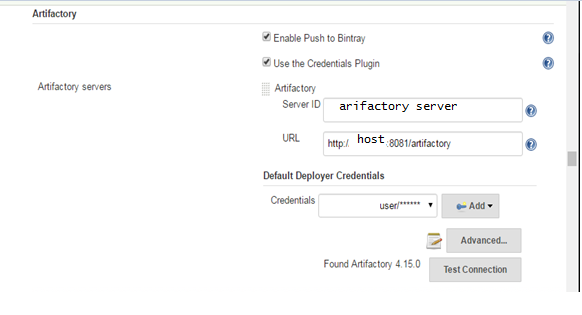
c) On Jenkins console navigate to “Manage Jenkins” scroll down and go to “Artifactory ”location and configure as shown below and click on test connection. You will find Artifactory version if connection is success .
Configure Maven path in Jenkins:
To build the java based appication we use maven as a build tool. Firstly, we install maven in the jenkins box/server, Next go to Jenkins page click on “Manage > Global Tool Configuration,” and scroll down to the “Maven” section. You’ll need to enter the path where you have installed maven into Jenkins.
Configure Sonar Qube details in Jenkins:
To run unit tests, code coverage tests and to perform code coverage analysis we use Sonar Qube and we want to publish code coverage analysis in Sonar Qube for every successful build job.
a) Login to Jenkins as administrator click on Manage Jenkins and navigate to Manage Plugins to install “SonarQube Plugin”
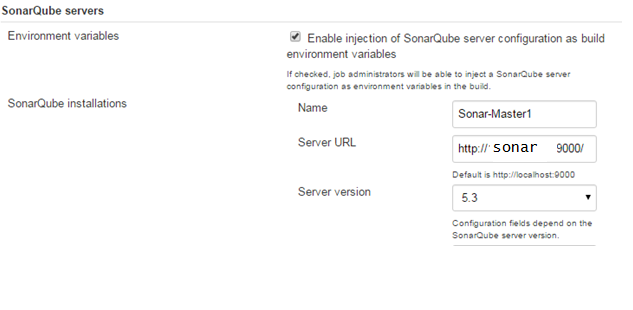
b) Goto Configure System of Jenkins to provide “SonarQube” server details as below.
c) Then configure SonarQube to jobs in Jenkins, go to build session enable “Prepare SonarQube Scanner environment” to inject environment variables related to the chosen SonarQube installation.
d) Add post-build step to configure “Execute SonarQube Scanner”.
Note: Always mention the sonar.projectKey=JobName(your/respective job name)
e) Analysis properties allows to pass some configuration parameters to SonarQube.
f). Once job is success you will find the output by clicking on “SonarQube”.